Thursday, January 29, 2009

Measure Twice, Cut Once

I've been unable to focus on anything else but figuring out how to secure the right side of the motor. My preference is to use the same material that I use for the left mounting plate, 3/8" aluminum. The first trick is that bracket has to be two pieces or have notches for the pole screws so it can be slid on from the left. The other gotcha is there has to be some clamping mechanism to secure the motor.


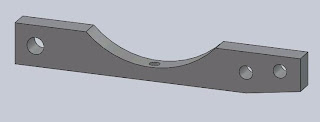
I came up with this basic design a few days ago, but dismissed it because two 3/8" brackets will be fine to resist motor torque and vertical/hoizontal loading from the chain tension. But loads parallel to the shaft need something else. It came to me this morning, add an angle bracket and use the mounting holes in the case. (edit one year later:  no additional pieces needed, the dual bracket arrangement is plenty strong with regards to axial loads.)

I was so jazzed at having a solution, I cranked out the template to make the wood prototype. I also tweaked the geometry on the left bracket, thinking I could cut them both and have the wood parts done. Haste makes waste...

I neglected to check if I had enough RotoZip bits
and busted my last one starting the new bracket. I did manage to cut out a sloppy version of the left bracket, so at least I could get it fitted. Wrong-O! In adjusting the bolt pattern location, I appearantly changed the bolt circle diameter, making that version completely worthless. The only bright side of these wasted efforts is that it's only wood, not the actual 3/8" Aluminum.

Wednesday, January 28, 2009

Motor Mounting v1.01


When I actually positioned the motor inside the frame, I could see that my earlier ideas for mounting the motor were not feasible. The motor is offset much further to the right side of the frame than I had envisioned. I will have to go with a face mounted bracket on the left side, and some type of clamp or belly bracket on the right half of the case.


After some careful measurements, I came up with a couple of designs. I'm pretty sure of the general design of the face bracket, but still working on ideas for the right side. I printed out a full scale drawing of the face bracket and glued it to a piece of 3/8" plywood. Using a Roto-Zip, drill and sand paper I followed the lines on the drawing.


Looking at the wood bracket mounted to the motor and the frame, it almost looks ready to use. But a second look shows some flaws. The orientation of the face bolts is going to interfere with the chain, since there is only about 1-3/8" clearance between the face plate and the frame. I will need to rotate the bolt pattern so one of the bolt heads is between the loop of chain. The other probem is the verticle position of the motor shaft relative to the swingarm pivot. The motor needs to go about 1/4" higher so the chain can be vertically centered on the swing arm.

Another thing that is obvious is that wood is not the ideal choice for the actual bracket. The weight of the motor twists the wood like its made of rubber. Fortunately, the final version will be made from 3/8" aluminum plate.


While I was making a mess in the garage, I decided to to cut the bottom out of the gas tank. This frees up some space for mounting electric compents and saves some weight. After breaking a few bits on the RotoZip I switched to the Dremel using little cut-off discs. While effective, the Dremel was excruciatingly slow, but the end result was pretty clean. Cutting out the fuel tank was almost cathartic. It's like I was setting the bike free from slavery to big oil.
Run El Gixxer, be free!!


Thursday, January 22, 2009

More Motor Mania


My wife says I'm "like a kid sometimes". I will not deny it. The motor arrived from D&D Motor Systems (http://www.ddmotorsystems.com ) and it was just like Christmas for me.


I threw the motor on the scale and it weighed in at a whopping 64.5 lbs. with the factory supplied mounting bracket.


I laid the motor inside the frame, just to get a feel for placement. It's going to stick out quite a ways on the right side of the frame. Fortunately it's a good looking piece of hardware.

Monday, January 19, 2009

Motor Madness


I've finally comitted to a motor: D&D ES-15A-6. This motor is heavier (62lbs), a little more expensive and much larger (~12.5" long) than the Etek-RT that I was originally thinking of using. I'm sure the Etek would have done the job, but in the end D&D's reputation for quality & customer support was the deciding factor.

If you have done any browsing of EV projects, you know it's fairly common to have problems with ordering parts from the cheapest source. I've spent enough time in the manufacturing arena to know some of the pitfalls in supplier selection. Up front cost is only part of the equation.


With the motor specified (and on it's way!!) I'd better get serious and figure out how to mount it. I see a lot of guys use the NEMA face mount by welding a plate to the frame, but that is not going to work on El Gixxer. Welding is not an option for this project, so the trick for me is using the existing rear motor mounts on the frame.


One advantage the D&D has over cheaper motors is that it can be mounted using the case as a structural member. The motor even comes with case bracket for mounting on flat surfaces. My idea is to use some 1.5" x .75" aluminum stock to make a couple of mouting struts. Once the motor arrives, I will make a wood model to try it out.